Customize the Windows 7 Logon Screen

Do you like to customize the Windows interface, and tired of the standard log on screen in Windows 7? Today we take a look at Windows 7 Logon Background Changer which is a free and Open Source app that lets you easily customize the logon screen.
Windows 7 Logon Background Changer
This cool app is free, Open Source, and lets you change the wallpaper on the Windows 7 Logon screen. It doesn’t require installation, and won’t change any of the system files. The download is a small zip file that contains an executable you can run from a flash drive, and also an installer in the Setup folder if you choose to install it.
9log
After launching Background changer, you can browse through the standard Windows backgrounds to get an idea of how it will look.

  •  
If you don’t want to use the standard Windows backgrounds, you can add your own folder of images.
After you’ve selected the background you want, click on the Apply button in the upper right hand corner.
Click Yes on the authorization screen.
Click Yes to User Account Control if it comes up.
The wait a bit while the background is applied.
 
Now you can log off to see how the new background will look when you or another user signs in. 
There are some different settings you can select like resetting back to the default pictures folder, preventing other users from changing the background, and adjust shadows.
Conclusion
There are several apps out there that will tweak the logon background, but this one from Julien Manici is one of the better ones that I’ve found. It’s easy to use and has a nice amount of features for tweaking the background. If you like to tweak and customize your Windows 7 interface, you’ll definitely want to take a look at this app.

How to Add Shutdown / Restart / Sleep to the Windows 8 Metro Start Screen


00_new_tiles_on_start_screen

If you have installed the Developer Preview of Windows 8, you probably have discovered the rather obscure method of shutting down the system. There is an easier way of shutting down, restarting, sleeping, and hibernating your computer. You can add tiles to the Windows 8 Metro Start screen that allow you to perform these tasks with one click.
To begin, click the Desktop tile on the Start screen to access the Desktop.
Right-click on the Desktop and select New | Shortcut from the popup menu.
Enter the following command in the Type the location of the item edit box and click Next.
shutdown.exe -s -t 00
Enter a name for the shortcut in the Type a name for this shortcut edit box and click Finish.
The default icon is not very representative of what the shortcut does, so let’s change it. To do so, right-click on the shortcut and select Properties.
The Shortcut tab on the Properties dialog box displays. Click Change Icon.
Because the shutdown.exe program you specified has no icons associated with it, the following message displays. Click OK.
By default, the icons in the shell32.dll file display. You can use the Browse button to select another .exe, .dll, or .ico file, but the shell32.exe file has many icons available. We selected a power symbol icon. Click OK once you have selected your icon.
The selected icon displays on the Properties dialog box. Click OK on the dialog box to close it.
The shortcut has to be copied to another directory to be available on the Start screen, so, copy the shortcut on the desktop.
Paste the shortcut into the following directory:
C:\ProgramData\Microsoft\Windows\Start Menu\Programs
You can either copy the path above and paste it into the address bar in Explorer or you can navigate to the directory. If you can see the ProgramData directory, see the note below.
NOTE: The ProgramData directory is a hidden directory. To gain access to it, click the Hidden items check box in the Show/hide group on the View tab.
Paste the shortcut into the specified directory. You will probably see the following dialog box when you try to paste the file. Click Continue to give permission to paste the file into the directory.
You should see a Shut down tile on the Start screen. One click on this tile will shut down your system.
If you don’t see the Shut down tile on the Start screen, you can search for it and pin it to the Start screen. To find the shortcut, move your mouse over the Start icon in the lower, left corner on the desktop to display the Start menu. Select Search.
NOTE: If you are using a touch screen, you can swipe from the right side of the screen to the left to access the Start menu.
NOTE: You can also access the Start menu in the same way on the Metro Start screen.
The Search panel displays on the right side of the screen. Scroll down and select Apps from the list. Enter “shut down” (or the name you gave your shortcut) in the Search Apps edit box. Press Enter or click the magnifying glass.
The Shut down shortcut displays on the left side of the screen. Right-click the shortcut. The options for the shortcut display in the lower, right corner of the desktop (instead of on a popup menu, like in Windows 7, and earlier). Click the Pin icon. You should now see the Shut down tile on the Start screen.
NOTE: Press Escape to exit the search and go back to the desktop.
To add tiles for Restart, Lock Workstation, Hibernate, and Sleep, enter the following commands create new shortcuts and enter the following commands on the first screen of the Shortcut wizard.
  • Restart Computer: shutdown.exe -r -t 00
  • Lock Workstation: rundll32.exe user32.dll,LockWorkStation
  • Hibernate Computer: rundll32.exe powrProf.dll,SetSuspendState
  • Sleep Computer: rundll32.exe powrprof.dll,SetSuspendState 0,1,0
The rundll32.exe file does have an icon available; however, you may want to change it. Use the Browse button to access a file with more icons. The shell32.dll file is located in C:\Windows\System32.
NOTE: For the Hibernate and Sleep options, make sure that the hardware in your computer support these options and that they are enabled.

Edit Your Hosts File

On occasion you will need to edit the hosts file on your machine. Sometimes because of an attack or prank, and others so that you can simply and freely control access to websites and network traffic.
hosts files have been in use since ARPANET. They were used to resolve hosts names before DNS. hosts files would be massive documents used to aide the network name resolution.
Microsoft kept the hosts file alive in Windows networking which is why it varies very little whether used in Windows, OS X or Linux. The syntax stays mostly the same across all platforms. Most hosts files will have several entries for loopback. We can use that for the basic example for the typical syntax.
The first part will be the location to redirect the address to, the second part will be the address that you will want to redirect, and the third part is the comment. They can be separated by a space, but for ease of reading are typically separated by one or two tabs.
127.0.0.1 localhosts #loopback
Now let’s look at accessing the hosts files in the different operating systems…

Windows 7

To access the hosts file in Windows 7 you can use the following command in the Run Line to open notepad and the file.
notepad c:\windows\system32\drivers\etc\hosts
sshot-2010-08-31-[19-41-19]
Once notepad is open you can edit the file. In this example we will block Facebook. To do this just enter in the following after the # mark.
0.0.0.0    www.facebook.com
Now that you have edited your Hosts file make sure to save it.
Now notice if we try to access Facebook in IE we can’t get to the page.
We also were not able to get to it in Google Chrome… (check notes at the end). Also for more info on editing your Hosts file, check out The Geek’s article on how to create a shortcut to quickly edit your Hosts file.

Ubuntu

In Ubuntu 10.04 and most Linux distro’s you can edit the hosts file directly in the terminal. You can use your favorite editor or even open your favorite GUI text editor. For this example we will use VIM. Like Windows 7, Ubuntu’s hosts file is located in the /etc/ folder, though here it is in the root of the drive. In order to edit the file you will need to open it as root which is why we use sudo here.
Now that it is open we can edit it to redirect Facebook into nothing. You will notice that with Ubuntu there is also a section for IP6. For most needs you will only need to edit it the top section and ignore the IP6.
Now we can save the file and try to go to Facebook.com. Just like in windows we will see that we are now redirected to a site that does not exist.

Snow Leopard (OS X 10.6)

In Snow Leopard, accessing the hosts file is very similar to Ubuntu. Begin in terminal and use your favorite editor, even is you wish to call a GUI text editor, it is easier to do so from terminal.
The file will look a bit more like Windows, only with a little less explanation. Again we are going to redirect Facebook.
This time it seems that 0.0.0.0 is a loopback and will direct you to the computers Apache test page.

How To Install DD-WRT On NETGEAR's R6300 802.11ac Wireless Router


tep 1: Download DD-WRT for the R6300

The first step -- like all the other steps, now that I think about it -- is very simple. Grab the latest DD-WRT build for the R6300 from our downloads area and unarchive the file. You will find a file with the .CHK extension inside the archive.

Step 2: Log Into the R6300's GUI

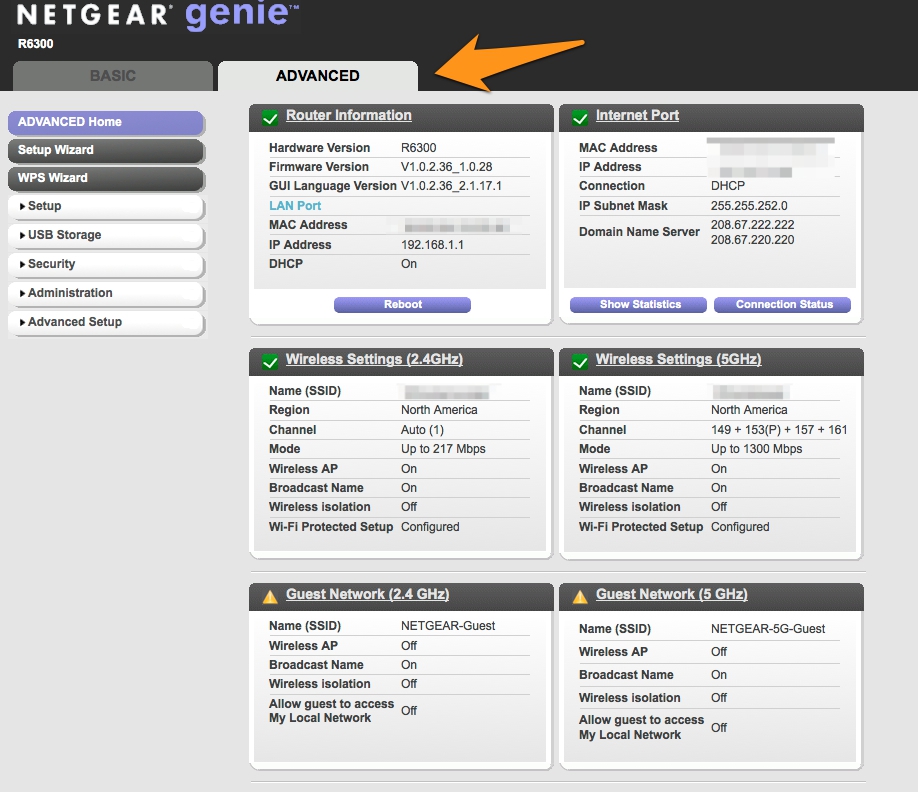
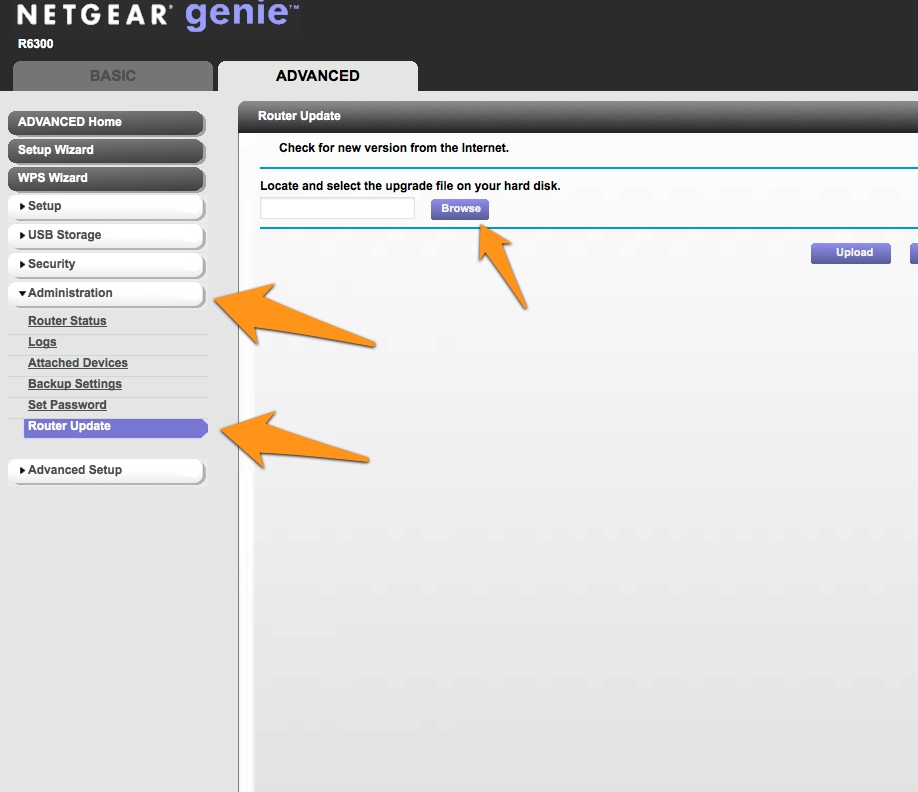
Navigate to 192.168.1.1 in your favorite browser and enter your username and password. Then, head to the Advanced tab at the top, and click Administration in the left menu panel.

Step 3: Upload DD-WRT Firmware to the R6300

In the Administration panel, click Router Upgrade. A new option will pop up asking you to browse for the upgrade file to use -- simply select the .CHK file for the upgrade that you unarchived in step 1.
Note that you will most likely, depending on the version, be presented with a warning regarding the firmware version being "older than the one you had." Simply bypass the warning by clicking through, and the router will begin the update.
When I performed the update, it happened extremely quickly, and I panicked at first -- thinking that it may have corrupted the router. However, this wasn't the case, and it was just that fast of a process. Allow the R6300 to reboot and settle for a few minutes before trying anything. (You may also want to perform a 30-30-30 reset, which the professionals usually recommend after flashing a new firmware. I did not do this and it worked fine, but your mileage may vary.)

Step 4: Log In to DD-WRT and Reset Password

Assuming the upgrade completed successfully, you'll be presented with an initial password reset screen, where you'll input your username (I suggest "admin") and password. Make sure to save this, of course, or else you'll have to do a hard reset and start all over.
After taking care of this, check out the main screen and make sure all is well.

Step 5: Complete Some Basic Setup Steps and Reboot

Now, it's recommended that you configure a few initial settings in the router to get things rolling, such as setting up your 2.4 GHz and 5.0 GHz access points (with encryption, of course).
uPnP is not enabled by default in the build as of this writing, so make sure to enable that as well.
After getting all set with the basics, perform an additional reboot to ensure all is well and your settings have been retained by the router.

Initial Testing of DD-WRT for the R6300

In my initial tests, the firmware has been performing extremely well. All of my devices have been immediately recognized, throughput is top notch as expected, uPnP is working flawlessly -- all is good.
Some users on the DD-WRT forums have reported that the 5 GHz band is not working properly, and as this is an early build as of the time of this writing (10/30/2012) some bugs are to be expected, or at least not surprising. However, 5 GHz worked for me with no issues, and has been working for many other users as well. One suggestion is to try different channels and also to eliminate any outside interference from other devices.
Please post your experiences with the R6300 DD-WRT buiild in our dedicated DD-WRT forum!

Turns on or disable Windows Firewall.


If you enable this policy setting, 
Windows Firewall runs and ignores the "Computer Configuration\Administrative Templates\Network\Network Connections\Prohibit use of Internet Connection Firewall on your DNS domain network" policy setting.

If you disable this policy setting,
 Windows Firewall does not run. This is the only way to ensure that Windows Firewall does not run and administrators who log on locally cannot start it.

If you do not configure this policy setting, 
administrators can use the Windows Firewall component in Control Panel to turn Windows Firewall on or off, unless the "Prohibit use of Internet Connection Firewall on your DNS domain network" policy setting overrides.